Epson Scan is not available for my product for Windows 11. What should I do?
Applies To
- Operating Systems: Windows 11 (the same approach also works on Windows 10, using the same Windows Scan app)
- Hardware: Any Epson printer/scanner where the Epson Scan software is unavailable or unsupported
- Software: Windows Scan app (Microsoft Store)
Description
If Epson Scan isn't available for your product on Windows 11, you can scan using the Windows Scan app instead — a free Microsoft Store app that scans directly using Windows' built-in scanner support.
Solution
1. Confirm Windows Recognises the Scanner
Before opening Windows Scan, make sure Windows has already detected your printer's scan function. Go to Start > Settings > Bluetooth & devices > Printers & scanners and check that your Epson device is listed.
Tip: On multifunction (all-in-one) printers, the scan function sometimes appears only under the printer's own entry rather than as a separate scanner. Select your printer in the Printers & scanners list — if Windows also detects its scan function, a "Scanner settings" option will be listed for that device.
If your device isn't listed at all, select Add device next to "Add printer or scanner" and let Windows search for it. Most Epson network and Wi-Fi scanners are detected automatically once the printer and Windows device are on the same network.
Note: Epson printer/scanners are typically detected over the network (Wi-Fi or Ethernet) rather than directly via USB alone, so a working network connection between the printer and your Windows device is required for Windows to find and use the scan function.
2. Install the Windows Scan App
- Download the Windows Scan app from the Microsoft Store.
-
Open Windows Scan. You can also find it by right-clicking Start, selecting Search, and typing "Windows Scan" — it's listed as Scan under Apps in the results.
Note: Windows Scan is listed as Scan in the Windows Start menu and search results, not "Windows Scan."
3. Load Your Document or Photo
- If your printer has a flatbed, place the item face down on the glass and close the cover.
- If your printer has a document feeder, load the item into the feeder — check your printer's documentation for whether it should face up or down.
4. Scan the Document or Photo
In the Scan app window, set the following options as needed:
- Scanner — confirm your Epson device is selected.
- Source — Flatbed, Feeder, or Auto-configured (Auto-configured works for most cases; otherwise match it to where you placed the item in Step 3).
- File type — JPEG, PNG, TIFF, or Bitmap.
- Save file to — select "Show more" to choose a save location. If you don't choose one, scans save by default to the
Pictures\Scansfolder.
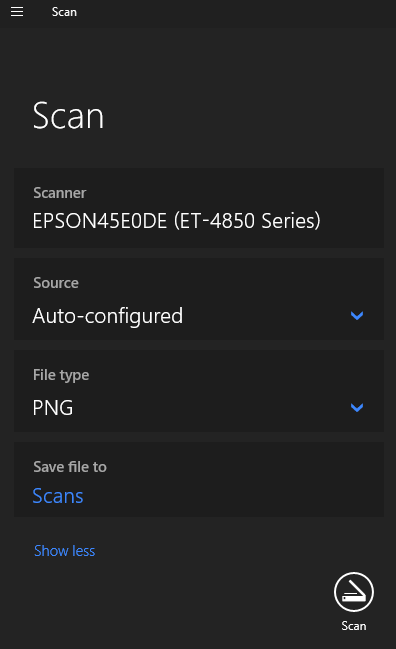
Select the Scan button at the bottom of the window to start scanning.
5. After Scanning
Once scanning finishes, the file saves automatically to the selected folder. Choose one of the following:
- View — opens the scanned item in the Photos app, where it can also be edited.
- Close — finishes this scan and prepares the app for another one.
To find your scans later, open File Explorer and browse to the folder you selected — or to Pictures\Scans if you didn't choose one.